RSyntaxTree Version: 1.6.2
Thank you for using RSyntaxTree. If you like it, please give a star on
GitHub. It will be a great encouragement for me 😃
About
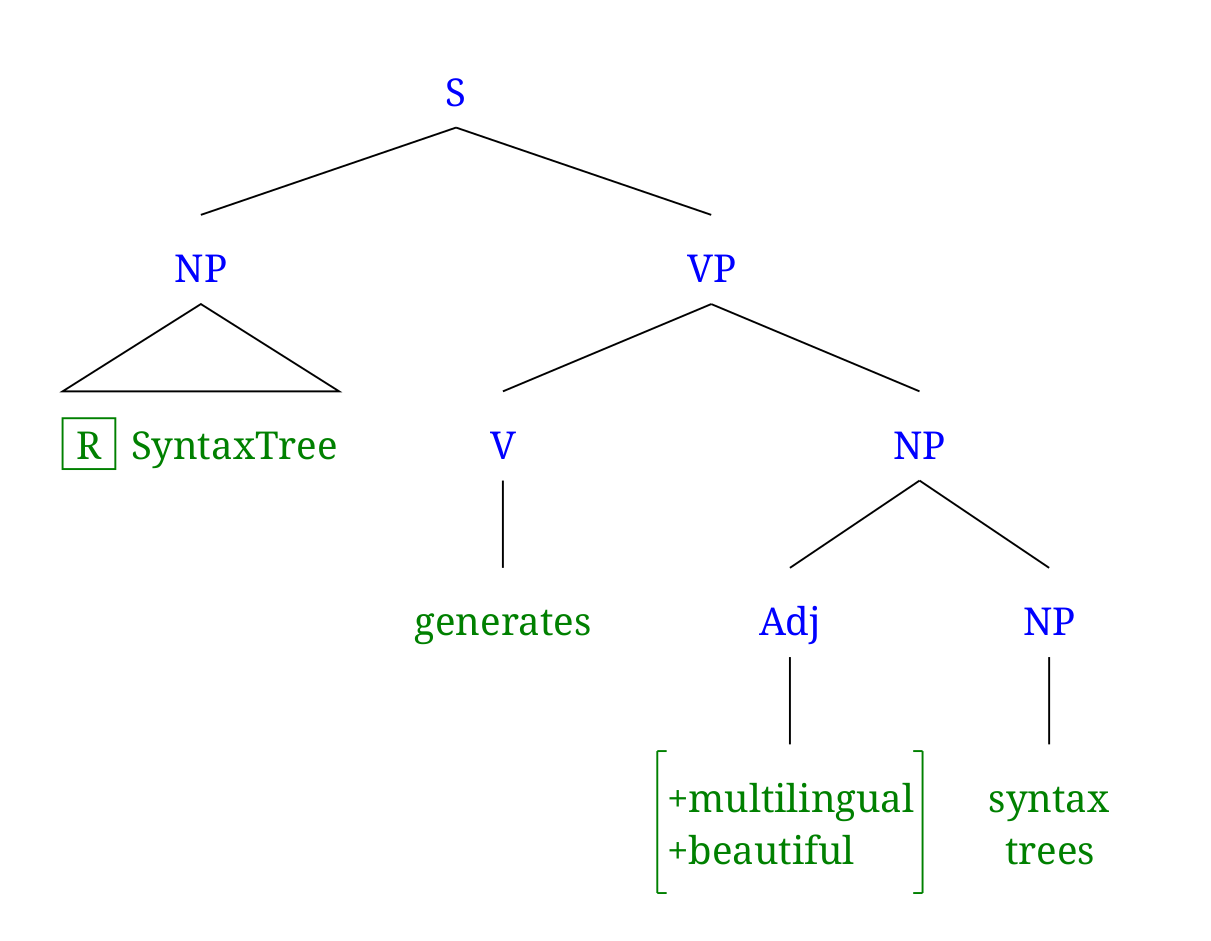
RSyntaxTree is a graphical syntax tree generator written in the Ruby programming language.
Documentation of the input text syntax and markups of RSyntaxTree is available in English and Japanese. See also Example Gallery for different types of sample input and result syntree images.
A command-line version of RSyntaxTree is available on GitHub. A web user interface for RSyntaxTree is also available; you can run RSyntaxTree with a web UI locally on your computer using Docker.
The original version of RSyntaxTree was inspired by phpSyntaxTree by André Esenbach.
What's new
- Region shade with
% syntax: shade the whole subtree a node governs [June 2026]
- A straight apostrophe in a label is now rendered as a typographic (curly) apostrophe [June 2026]
- Left-to-right tree layout (
Direction option: Top to Bottom / Left to Right) [April 2026]
- Per-node coloring with
@color: syntax (named colors and hex colors) [January 2026]
IPA (International Phonetic Alphabet) virtual keyboard added [June 2025]- Improved usability of the Web UI; Japanese UI added [February 2025]
Past updates
- Escape square brackets with
\[ and \] [October 2024]
- Cross-hatch rendering issue fixed [September 2023]
- PDF download feature added [February 2023]
- Line edge rendering improved [February 2023]
Line width option added [February 2023]Traditional color option added [February 2023]Hide default connectors option added [February 2023]- Extra connector drawing feature added [February 2023]
Noto Sans Mono font option added [January 2023]- The
¥ symbol can be used in place of the backslash \ to escape certain characters [November 2022]
- Documentation in 日本語 (Japanese) has been added [November 2022]
- RSyntaxTree on the Web (UI sourcecode package you can run locally using docker) [June 2022]
Polyline connector option [February 2022]- Improved user interface (error message display; image zoom, etc.) [January 2022]
- Comprehensive code rewrite [January 2022]
- Path drawing functionality (non-directional, directional, bidirectional) [January 2022]
- Text markup is more flexibly applicable than before [January 2022]
- New text markup patterns (newlines, brackets, horizontal lines, boxed texts) [January 2022]
- Triangle can be specified in all connector modes (
auto, bar, none) [January 2022]
- Subscript (
_text_) and superscript (__text__) specification is possible (e.g. DP_i_ → DPi, T__0__ → T0) [December 2021]
- Newline characters
\n can be used inside terminal nodes [December 2021]
- Label-less terminal nodes are now allowed (e.g.
[A [B] [C]]) [November 2021]
- Auto bracket close option [November 2021]
- Math symbol rendering [November 2021]
- Better image quality [November 2021]
- Some decoration symbols have been altered [November 2021]
- System fix (SVG download error) [November 2019]
- Bug fix (SVG color on/off) [April 2019]
- White spaces can be included in node labels with the
<> notation (e.g. Modal<>AUX) [June 2018]
- Various sizes of
margin to the image [February 2018]
- Better text editor using Ace [February 2018]
Connector height option [March 2018]- Syntax highlighting of input text [March 2018]
- Refined site design and documentation [March 2018]
- Text styles (italic and bold) and decoration (underline, overline, line-through) [March 2018]
Related blog posts
RSyntaxTree tag on yohasebe.com
Author
Yoichiro HASEBE
License
The MIT License
 RSyntaxTree